BUILD TUNE RACE RC YACHTS

Components for the bow, stern and bulkhead, simply a glass and epoxy sheet laid on a flat board covered in packaging tape which is a great release agent. For the rudder and servo supports, I laid glass over strip wood wrapped in packaging tape to create a light rigid beam to bond across the boat.

The hull is laid up in the same way as the plug. Pre cut the cloth and mark a centreline on the hull and the cloth. Allow for an overlap of 1 inch on the foredeck.

I used West systems slow cure epoxy resin which in the Summer gave me about half an hours work time. Stop work when the epoxy starts to go stringy and clean your tools with Acetone before mixing a fresh pot of epoxy.
I use Nitril gloves which I wash in acetone to remove any sticky epoxy. I also use a full face filter mask although this is not needed. Unlike Polyurethane, epoxy does not smell too bad
To begin the layup, paint the hull with epoxy.
Add the first layer of E cloth and saturate the glass with epoxy using the aluminium roller. Take your time and make sure you get rid of all air bubbles. I worked on the hull first and then turned the mould over to work on the deck. Allow a 1 inch overlap on the deck and cut any excess cloth away with scissors. Keep a jar of acetone handy to keep the scissors clean.
I added more epoxy over the first layer of E cloth prior to adding the second layer. Roll out and finish as per the first layer. Repeat for the final layer of S cloth
Wrap the finished hull tightly in Peel ply.
When I built the hull in about 75 degrees, I had to mix a second lot of epoxy for the final layer of S cloth as the first lot started curing.
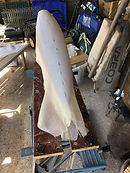
Once hardened, remove the peel ply, then add 2 coats of high build epoxy primer. Like the plug the hull will look a mess but will look great once sanded.
Sand the hull so you can see through to glass but do not cut any fibres. This will make the hull as light as possible and ready for a top coat of 2 pack polythene which is done after fit out. Fix any faults/holes as necessary.
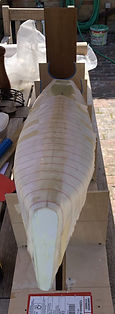
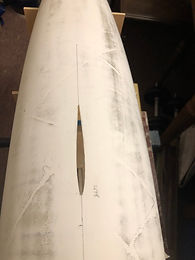
Once happy with hull finish cut through the centreline of the the foredeck and stern deck. Brad suggested a knife but I used a fine cutter on a Dremel. Prise the hull off the mould. This process was much easier than I thought it would be. The whole structure is flexible so once off the mould so put in a jig to keep the designed shape.


完成主甲板
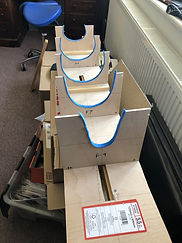
一旦船體脫模 將其直接放入夾具中以支撐船體。 我使用平面圖在膠合板上切出框架並將它們固定在堅固的平板上 夾具將用於對齊鰭和舵
單擊任何圖片以展開圖像。
Bond the foredeck and stern deck
What you need
-
5 minute epoxy
-
Slow cure epoxy
-
Bent piece of wire as long as the foredeck
-
1" glass tape
-
Bow and stern plates
The process
Tape the the top of the previously cut foredeck and stern together with masking tape prior to bonding below.
Sand the underside of the foredeck to provide a key for the 1"tape you are about to apply
Bond the underneath of cut foredeck and stern deck with 1" fibreglass tape.

Allow to cure and remove the masking tape. I put the glass tape underneath the deck and on top but I think you only need to bond underneath and fill the gap on top.
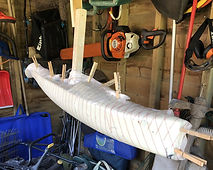
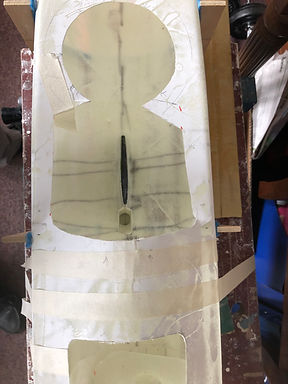
To get the tape all the way up the foredeck, wet the tape with epoxy and roll up. Using the wire with a 1" bend at the end, to support the roll and unroll it right (with the hull upside down) to the end of the foredeck. Once unrolled it should sit flat and use the wire to move the tape if necessary. See image 4.
Remember to put some peel ply over the top of the tape on top of the deck. Image 6. (This was probably an unnecessary step as I think the tape only needs to go on the underside.)
The foredeck will be very strong because you will have 6 layers of glass including the overlay and the 1" tape. Slightly over engineered I think.
Repeat the process on the stern deck. I had to put a plate across the stern and the next bridge as I had not finished the original layup properly. Image 8 and 9.


Having taped on top of the foredeck I had to re apply 2 coats of high build epoxy and sand down. There is no need to do this if you bond underneath the deck only.
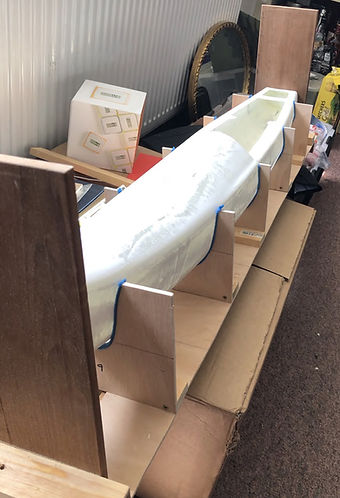
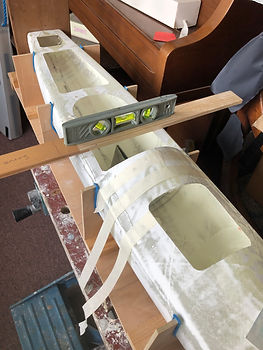
I fitted 2 perpendicular end plates onto the jig so I could shape the bow and stern on the hull to be, one, vertical and two, at 90 degrees to the centre line of the boat. Image 10

Trim the bow and stern plate and fit with 5 min epoxy. Spot glue in place initially and then seal and fillet with epoxy and micro balloons.
連接前甲板和船尾甲板
你需要什麼
5分鐘環氧樹脂
慢固化環氧樹脂
一根與前甲板一樣長的彎曲鐵絲
1"玻璃膠帶
船頭和船尾板
過程
在粘合下面之前,用膠帶將先前切割的前甲板和船尾的頂部用膠帶粘在一起。 見圖 5。
打磨前甲板的底面,為您將要貼的 1" 膠帶提供鑰匙
用 1 英寸玻璃纖維膠帶將切割的前甲板和船尾甲板的下方粘合起來。 圖 4。 允許固化並去除遮蔽膠帶。 我把玻璃膠帶放在甲板下面和上面,但我認為你只需要在下面粘合併填補上面的空隙。
要將膠帶一直放在前甲板上,請用環氧樹脂潤濕膠帶並捲起。 使用末端彎曲 1 英寸的金屬絲,您可以支撐捲軸並將其展開(船體倒置)到前甲板的末端。 一旦展開,它應該平放並在必要時使用金屬絲移動膠帶。 見圖 4。
記住在甲板頂部的膠帶頂部放一些剝離層。 圖 6。 (這可能是一個不必要的步驟,因為我認為膠帶只需要放在下面。)
前甲板將非常堅固,因為您將擁有 6 層玻璃,包括覆蓋層和 1" 膠帶。 稍微過度設計。
在船尾甲板上重複該過程。 我不得不在船尾和下一座橋上放一塊板,因為我沒有正確完成最初的上籃。 圖 8 和 9。
在前甲板上貼上膠帶後,我不得不重新塗上 2 層高強度環氧樹脂和沙子。 如果您僅在甲板下方粘合,則無需執行此操作。
我在夾具上安裝了 2 個垂直的端板,這樣我就可以將船體上的船頭和船尾塑造成一個垂直和兩個,與船的中心線成 90 度。 圖 10
修剪船頭和船尾板並使用 5 分鐘環氧樹脂。 最初在適當的位置點膠,然後用環氧樹脂和微型氣球密封和填充。 圖 8 顯示了初始擬合。
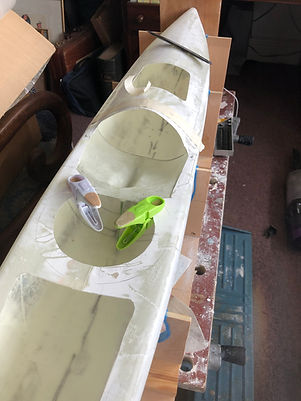
最後移除多餘的甲板,以便根據計劃看到孔。 見圖 7 和 8。
在圖像 5 中,只有船尾甲板就位。 在下一艘船上,我將完成甲板直至塞柱。
現在來了 我認為是施工過程中最困難的部分。 打標 向上並在船體上為鰭切一個孔,然後粘在對齊的鰭盒中,然後將其粘合到甲板和前艙壁上。 當我建造我的下一艘船時,我將添加鰭定位的圖片。
單擊任何圖片以展開圖像。
The fin case, bulkhead and forward aft deck
What you need
-
5 minute epoxy
-
Slow cure epoxy
-
Fin
-
Fin case
-
Rudder
-
Rudder stock brass tubes
-
Cross bars for rudder stock and rudder servo mount.
-
Prepared forward part of the aft deck
-
Cut out bulkhead shape to fit under fordeck
-
1"glass tape
-
Various fittings, jib tack bolts, mast ram, mainsheet post, back stay bolt, mainsheet pulley blocks, fairleads to allow the endless mainsheet to go through bulkhead
The Details
Tape the hull into the jig so the shroud points on the deck are parallel to the base of the jig. Everything will be aligned to this.
Measuring from the stern datum, mark the front and back of the fin hole on the outside of the hull. Then mark a centreline which you will have marked on the frames of the jig. This will get the correct alignment for the fin hole. Remove the hull and using the fin, mark the contour of the fin. Cut out the slot for the fin using a Dremel or similar being careful to cut well inside the line. Use sandpaper to open the slot to fit the fin exactly.
Tape the hull back in the jig. With the fin in the slot, push the fin case over the fin so that the bottom of the case is lying on the hull.
There are two measurements on the plan to align the fin, one shows the tip of the fin where is enters the bulb. This should be 330mm from the bottom of the hull and the other measures from the same fin tip to the bottom of the bow of the boat. If set up correctly the leading edge of the fin should be perpendicular to the waterline. Shape the bottom of the fin box and fin until this is achieved. Ideally the fin should fit all the way into the fin box.
I used some string to determined the position of the tip of the fin.

Reinforce the shroud bolt locations with half an inch of 1" tape and once dry fit the shrouds.
There is a huge amount of strength with this design in this area and no further reinforcement is needed.
Fit the shroud bolt now while you have access to the underside of the deck.
Once the base of the fin box is shaped and the fin aligned, now is the time to dry fit the forward part of the aft deck and trim the top of the fin box until the deck fits snuggly. Spot glue the fin box in place with the fin in the box and support in the right position.

Once fixed seal the fin box to the hull with 5 min epoxy and microballoons with a small fillet. Finally reinforce the fin box to the hull with 1"glass tape and epoxy.

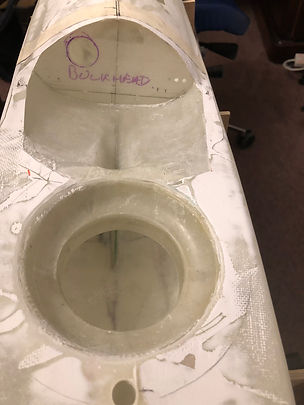
With the fin box in place, dry fit the forward part of the deck with the fin box and forward bulkhead.
Once happy with fit, do a final check that the forward bulkhead is in the right place from the stern datum. Get this wrong and you will have issues with your mast ram. Spot glue with 5 min epoxy and micro balloon. With 5 min epoxy and micro balloon seal the bulkhead and seal where the fin box connects with the deck. Finally reinforce the top of the fin box with fin one inch tape.

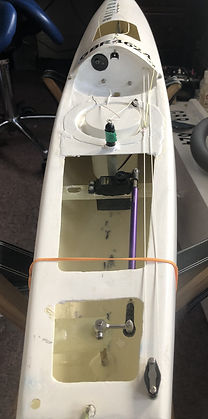
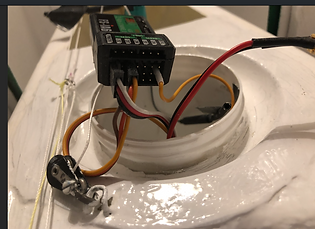
Finally glue the radio pot holder under the deck and seal with epoxy. In my first build I glued the pot on top which looks messy.

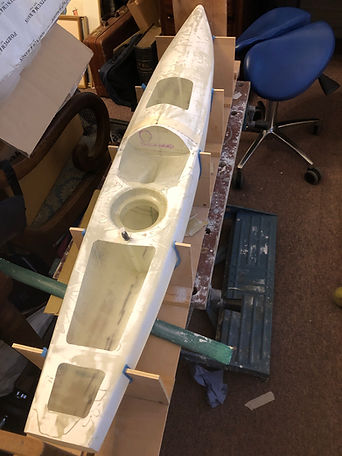
Bond in the cross beams for the servo and rudder stock with one inch tape See image below for positions. Remember to sand the inside of the hull to create a good keyed surface.
Drill the hole in the deck for the fin bolt and mast. Now is the time to check for leaks. Fill the depressed area of the deck forward of the radio pot with water and see if there are any leaks.
Drill a 4mm hole in the hull for the rudder, with the central point located from the jig and distance from the aft datum measured off the plan.
The rudder stock is 2 tubes of brass, one 5mm o/d and one 4mm o/d. The two tubes slot into one another and the rudder post goes inside for a very tight fit.
Mark on the rudder brace bar a line which when a hole is drilled for the stock ensures the trailing edge of the rudder does not extend beyond the stern of the boat. The rudder stock will project a couple of mm above the cross bar. Drill a hole in the centre and ream it wide perpendicular to the hull. Fit the stock in place on the rudder and in the boat. Apply some 5 min epoxy with micro balloon to fix the top of the stock with the rudder exactly aligned with the keel. Leave to set, then seal the stock in the hull and reinforce the top if necessary. The worst is over. My first cross beam was so strong I saved weight by cutting it in half. The next cross beam will be much lighter.
Paint the whole boat in 2 pack polyurethane top coat and lightly rub and t-cut to desired finish


Fit the mainsheet post, backstay bolt, aft pulley for mainsheet, fairleads for sheet control through the bulkhead, setting these as low as possible so they don't interfere with the kicker on a run on port gybe. Fit the 4 jib sheet leads in the foredeck and the 3 tack bolts. Finally, drill a bung hole, push a needle through the centre of the bung, thread a chord and tie to the backstay.

Drill two bolts to hold the winch bracket in the forward bulkhead. Align the winch with the fairleads.
The bracket was just a 90 degree moulding cut to shape around the winch and enough flange to brace it securely to the bulkhead.

Drill a hole for the mast ram and fit.
Bond a strengthening post in the foredeck around the jib tack area to stop foredeck lifting under load.

Don't fit the radio pot until correctors have been fitted.
船上最後的組裝工作
你需要什麼
舵的舵臂
從方向舵到舵機的連接器
伺服
接收者
電池 LiFeP04 電池 1600mA(超過一整天的壽命)。 如果您需要減輕重量,您可以使用低至 900mA 的電流。
防水開關
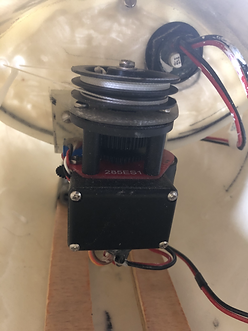
RG 絞盤和支架。
過程
在左側的前隔板上鑽一個孔,用於電動開/關開關並安裝。
將絞盤安裝到支架上,鬆散地安裝到隔板上。
在伺服器的十字支架上打一個孔,然後將電纜安裝並連接到無線電電位器。
在無線電鍋頂部的支撐架正下方開一個孔,然後將電池的伺服和開關電纜穿過孔連接到鍋的內部。
將舵機連接到接收器上的通道 1。
將絞盤連接器連接到通道 3,並將第三根鬆動的絞盤電纜安裝到冗餘中心銷上,比如通道 5。
將開關連接到絞盤。 盡可能使用 XT30 連接器,否則您將獲得足夠的絞盤功率。
如果您打開電源,幸運的話,打開的發射器將移動方向舵和絞盤。
如果一切正常,您就可以安裝無端床單調節器了。
無休止的工作表是一項繁瑣的工作。 我購買了帶有自張緊回程滑輪的絞盤,即它裝有一個彈簧,可以阻止板材線鬆弛。
通過完全上下移動發射器上的控制桿來找到絞盤的終點。 我用完床單完全取出,向下完全放入。
離開 控制桿向下(板入)。 取兩條線穿過艙壁導纜器,然後跑到絞盤。 外線會將床單拉入,而內線會將床單放出。 在絞車上,底部滑輪是片狀的,頂部彈簧滑輪是片狀的。用外線系在下部滑輪上並繞滑輪纏繞 5 圈。 將內線系在上滑輪上,但只使用一個和一個 半圈。 保持繩索輕微張緊,這樣您就不會丟失絞盤上的包裹,現在您可以安全地安裝絞盤。
外線沿著甲板延伸,穿過右舷靠背附近的後滑輪,從滑輪組中穿出並系在 2" 處的 5 毫米不銹鋼環上。 內線(片外)可以張緊,您會感覺到自張緊輪的阻力並系在不銹鋼環上,因此循環系統合理緊密。 主和懸臂板將系在環上。 無盡的主板系統已完成。


If you turn the power on, with any luck a switched on transmitter will move the rudder and winch.
There is a whole section on the setup of the radio transmitter HERE.
If all works you are ready to fit the endless sheet adjuster.
The endless sheet is a fiddly job. I bought the winch with a self tensioning return pulley, i.e it is fitted with a spring that will stop the sheet line going slack.
Find the end points of the winch by moving the control stick on the transmitter fully up and down. I use up for sheet fully out and down for fully in.
Leave the control stick down (sheet in). Take two lines and thread through the bulkhead fairleads and run to the winch. The outer line will pull the sheets in and the inner will let the sheet out. On the winch the bottom pulley is sheet in, the top sprung pulley is sheet out. With the outer line, tie off on the lower pulley and wrap 5 times round the pulley. Tie the inner line to the upper pulley but only use one and a half turns. Keeping the lines lightly tensioned so you don't lose wraps on the winch, you can now securely mount the winch.
The outer line is run along the deck and through the aft pulley near the backstay on the starboard side, threaded out to in and then tied to a 5mm stainless ring 2" from the pulley block. The inside line (sheet out) can be tensioned, you will feel the resistance of the self tensioning pulley and tie off to the stainless ring so the endless system is reasonable tight. The main and jib sheets will tie off to the ring. The endless mainsheet system is complete.


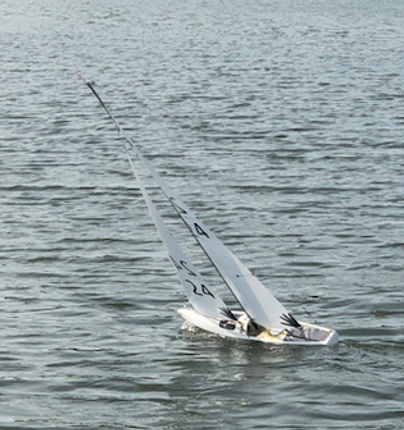
最終結果
Next Section