The new optimised Alternative boat build
When I play golf, if I drive off the tee and lose my ball because of an errant swing, why is it that my second attempt is nearly always perfect making me wonder why didn't I swing like that on my first shot!
It's kind of like that when you build a second boat. The first attempt is full of small errors, air bubbles, lifted glass at the bow and stern, too much epoxy used, etc. The second boat has errors but it is much better and lighter.
I started the second boat yesterday afternoon and unwrapped it this morning and what a beauty she looks. If you are interested, here is what I did with a few pictures.
I started by repairing the old hull plug, patching up some damage when I cut the previous boat off the plug with a dremel. After a rub down and 5 coats of release wax it was good as new and ready for the layup.
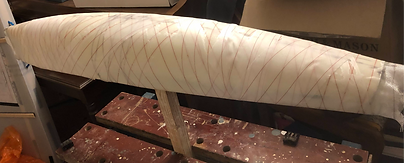
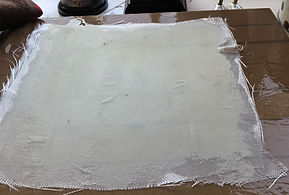
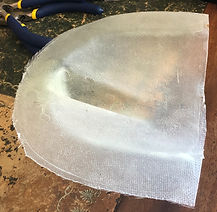
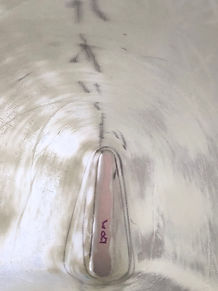
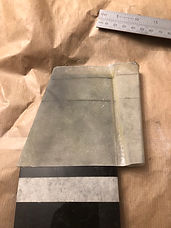
I cut out 3 sheets of 124gm S glass from a paper pattern I made earlier. I acquired 3 sheets of brown paper which were from a delivery of an old flower arrangement (my wife's!). With care, I cut the glass cloth straight onto the brown paper from the paper pattern I made earlier. The cloth was cut with no mess. In addition to the cutting, I drew a centre line with a felt pen and perpendicular lines (to the centreline) for the bow, stern and edge of the foredeck. This is done to allow easy alignment (when laying down the cloth onto the plug) with a centreline drawn down the keel of the hull along with a mark to indicate the foredeck. The brown paper not only seperated the 3 layers of cloth but also allows the cloth to be rolled up and carried as well as protecting the edges, keeping the cloth flat and clean. (Image 1)

Last summer on the first boat build, I cut the glass outside on a table, did not use any paper or protective cover and ended up with strands of glass fibre all over the patio!
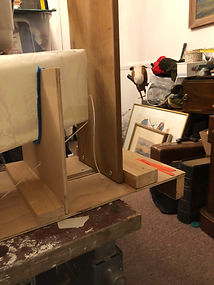
With the cloth prepared, I was ready to lay the hull up in the garden shed. Yesterday it was about 12 degrees which is just warm enough to work with epoxy. I needed a workbench to clamp the hull upside down (Image 4), a piece of wood hanging from the shed ceiling to screw the plug support post to work on the deck (Image 3), paper towel to wipe up mess, acetone for cleaning, nitril gloves to protect my hands, West System epoxy (slow cure), three plastic pots (I use fromage frais pots), a 2 inch paint brush and an aluminium roller for removing air bubbles, peel ply for wrapping the epoxy, screwdriver and electric drill for mounting and dismounting the plug. With all the bits together on site, I was ready to go. After mixing the epoxy using the self measuring plungers that you screw on the resin and hardener tins (3 pushes of the plunger will do one layer of glass) I applied resin to the hull side of the plug, being careful to wet the curves of the deck. The epoxy will not lie smooth on the wax and will pull back into globules looking a bit messy but it won't matter. Taking the first layer of cloth and with the boat mounted upside down on the workbench, hold it over the hull aligning the centreline, bow, stern and foredeck marks before laying the cloth down on the epoxied plug. (Image 2 3 and 4)


Gently smooth out the cloth with the paint brush and work out from the centre until the cloth is flat all over. This is quite fiddly but by taking time and being patient the cloth will lay out perfectly. Next step is to go over the cloth with the paint brush (be very gentle) and wetting the cloth where dry, removing air bubbles as you go. Use the epoxy sparingly as excess resin just adds weight. Finally go over the hull with the aluminium roller to get any missed air bubbles.
Now remove the plug from the workbench and screw to the bar dropping from the shed ceiling. Initially fix the hull upside down and then carefully allow the plug to rotate down while supporting the cloth over the deck, until the deck is level. (In my first build last summer, I picked the plug from the workbench after wetting the cloth on the hull, rotated it so the deck was uppermost, raised it up to the supporting bar and the glass cloth fell off onto the floor. You have been warned!)
Before you work the cloth into the deck with the paintbrush, cut away any excess. On the first layer I used a 1 inch overlap. On the second layer, I butt the ends of the cloth (ie no overlap) and on the third layer use an overlap again. In this way you avoid too much weight along the centreline of the deck. On my first boat I ended up with 6 layers of cloth on the centreline which produced a strong boat but heavy in the ends.
Work the cloth into the deck with the paint brush in the same way as the hull, until flat and smooth. Sorry there are no pictures of this as my gloves were coated in epoxy at the time!
Check over the hull and deck in good light to make sure there are no air bubbles and the cloth is tightly bonded at the bow and stern.
Leave the plug until the epoxy remaining in your mixing jug starts to go stringy. When this happens, the first layer of cloth will be stuck nicely to the plug and won't move when you apply the second layer. The longer you can leave it between layers the better. Half an hour should be long enough.
Wash your paint brush, gloves and roller in acetone and mix the second batch of epoxy. Bin the 1st mixing pot.
For the second layer, drape the cloth over the hull taking care with the alignment marks and brush out as before using just enough epoxy to wet the cloth.
Repeat for the third layer remembering to clean tools in between. I use four plunges of epoxy for the last layer because I wanted the outer layer slightly wetter. Any excess would be absorbed by the peel ply.
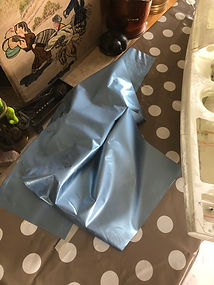
Finally wrap in peel ply. I used 10 metres of 100mm wide. Overkill I know but it did an amazing job even though the hull look a bit mummy like. (Image 5)
At the same time as laying up the hull, I made the components in Image 8. 9. 10. 14, 15 and 18. The fin box was Dave Creed's work.
A thin sheet for the bow stern and bulkheads
The mould for the deck layout above the fin box and final deck

Strip of S glass for bonding the deck

Reinforcement for the fordeck understanding the jib tack eyes

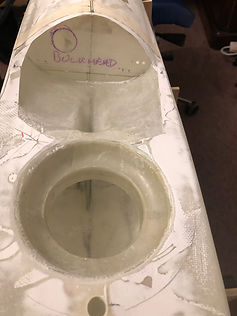
The radio pot and forward bulkhead

Paper template for forward bulkhead

I peeled the peel ply off this morning to discover a hull with no air bubbles, perfect adhesion at the bow, stern and foredeck.
In all the process took about 3 hours
All I need now are two coats of epoxy primer rubbed smooth and I am ready to pop the hull off the plug. Here is the rough finish prior to sanding
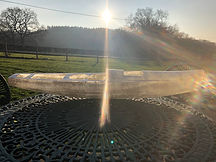
The finished hull popped off the mould safely in its supporting jig with the deck taped together to hold it secure

It all looks good and I know that the hull is useable so I can pay the second design fee and fit the boat out.
Having added two coats of epoxy primer, it is time to rub it all back to the surface of the S glass to make the hull as light and as smooth as possible. Up to two hours sanding. Joy! but the end result is worth the effort.
After painting on 250gms of High build epoxy primer, I sanded 200gms off on Saturday. The result is a very light smooth hull which you can see through.
The hull will remain in this condition until the deck has been finished and all the holes drilled. Then it is time for the vinyl wrap in metallic blue. Can't wait to see how it ends up when cut off the mould.
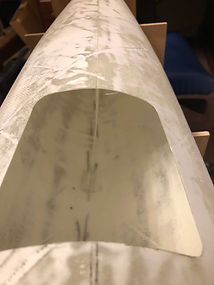
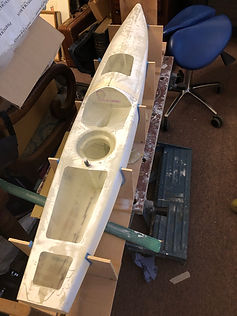
Once the hull is off the mould it goes straight into a support jig, with the frames cut from the design plan. This jig is marked and used for setting the fin position and rudder. (Image 7)
The foredeck and aft deck is bonded using 1 layer of 124gm s cloth (Image 13). The hull is strong and ready for the fin box, bulkhead and adjoining deck and radio pot to be bonded in.
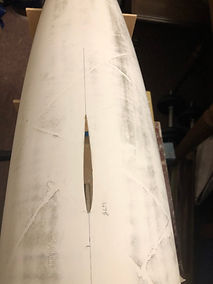
On Sunday I cut all the access holes, (Image 33) and added two further layers of S glass around the fin box area in the hull, bonded the deck with an extra layer of S glass at the jib take off point and fitted the transom
I put small reinforcing plates in the deck at the stern and put 1 layer of S glass about 1 inch wide down the centre of the foredeck.
All up weight of the hull with all glass infrastructure but ex fitting will be around 400gms, considerably lighter than my first hull especially in the ends but heavier than the professional hulls. Having said that the hull is very strong, light in the ends and should be competitive.
Todays job is to fit the fin, bulkhead, deck moulding and radio pot and a post for the jib tack take off point. On course to finished hull by end of week.
A long day sealing the bow and stern, (Image 18 and 19) strengthening the foredeck, building an ultra light foredeck post (Image 14), cutting a slot in the hull (Image 21), measuring and shaping the forward bulkhead (Image 15 and 16) , fin case and deck. Lots of pictures below in a slightly random order.


Tomorrow I hope to bond in all the pieces and then the only other major jobs are to fit the plates for the servo and rudder stock which will likely be done on Wednesday. Then a final rub down and drill all the holes for the deck fittings. Finally after that I can wrap the boat in its metallic blue vinyl. Its an experiment but I am sure it will be worth the effort and if it doesn't work I can always paint it.
Fitting the fin
Yesterday was all about getting the fin box fitted. Alignment of the fin in exactly the right position with the design measurements and having it vertical is the most critical job on the boat. Get this wrong and the boat will be hard to balance and may sail higher on one tack that the other.
The boat in my jig is set up to be level on its water line, ie there is a horizontal line connection the bottom of the bow and bottom of the stern. The leading edge of the fin sits perpendicular to this line. Get the jig right and everything is easy. On the plan there are two measurements, one from the hull to the leading edge of the fin and then one from the tip of the bow to the bottom of the fin where it enters the bulb. Set these measurements and the fin leading edge should be perpendicular tp the waterline of the boat. I was less than a degree out. See image 24-27.
To get the fin exactly vertical looking from the stern, I level the boat at the shroud point and use a level on the fin to make vertical and then use masking tape to secure it. Gravity helps in picture 27.
The string in the picture is used to measure from the bow to the fin but I did have to make holes in the jig.
Tomorrow, I can fit the final pieces of the deck and the bulkhead.


Finishing the bonding
Yesterday was gluing day. Fitted the forward deck, pre drilled bulkhead, radio pot holder and mainsheet post.
Only one small error. I forgot to seal and reinforce the top of the fin box
I have the fiddliest job to do that today plus final fit for the servo mount and rudder stock mount. Nest jobs are to pre drill all the fitting holes, apply filler where required and final sand ready to apply wrap.
When fitting the mainsheet post, I accurately measured a centreline at the deck and then did the same with a string 6 inches off the deck. Then using a set square I was able to get the mainsheet post upright and aligned with the fin case, back stay, jib sheet eyes and jib attachment points which are all marked up. Fingers crossed the sails will set the same on both tacks.
Hull weight so far is 420gms. Old hull weight at this point 620gms. Maybe 350gms is achievable with a slightly thinner layup. I was generous with the epoxy at the base of the fin but this is where the correctors with be anyway. Estimate approx 400gms of correctors will be required.
Tidying up
Final bit of reinforcement went in yesterday. Not much to show as boat looks similar to day before but with addition of rudder stock and servo supports. Giving the hull a good t cut to look for any rough spots and then the metallic blue wrap
Little remaining jobs to do after the wrap like final fit of fin and add the electronics and fittings


Finished the build
With the final jobs knocked off on Friday the hull is ready for wrapping. I spent today sanding and cleaning the hull and deck, final fit of the fin and rudder which ended up exactly according to the design plans and are both in line with each other. Tomorrow will be wrapping day.
Ordered the new PG tubes from Potters Solutions and a couple of bits and bobs from Sailsetc. Once the boat is wrapped I can set up the new rigs using existing fittings apart from the shrouds. Then a bit of in house tuning and I am ready to get on the water.
Its not a wrap
The wrap failed. There is so much curvature in the hull and deck, you need to stretch the wrap so much before application and you need several pairs of hands, so it's back to the paint spraying.
The boat is finished bar the spray and as Mr Gibson said you are far better off with paint as damaged vinyl is impossible to repair. He should know he used to wrap 18 footers amongst other things. Why didn't I speak to him first.
The dream was there, the experience was missing. Loved the metallic finish but it is not to be.
Onwards and upwards and off to watch the 18 footers race round Sydney harbour in the JJ Giltinan. On the computer of course
Decision time on paint
It has been a long process trying to sort the paint for the boat. I could use my tried and tested 2 pack polyurethane which I know is hard durable and the right solution, but I do want to spray to keep the decks looking smart. As you know I tried using vinyl wrap but the curves of the boat proved too much.
The search took me to spray cans of epoxy, enamel and other finishes but I came across an industrial acrylic based paint in a spray can. It is designed for repair of industrial coatings indoor or external. Its a risk I know but I prepared a sample this afternoon and it has great colour, is hard, flexible, great UV properties and resistant to scratches. The date sheet is here:
http://www.farnell.com/datasheets/3165638.pdf
So on it goes tomorrow and we will see how the paint performs. The pictures below show the new spray look on a sample and the effect I am trying to avoid when painting 2 pack Polyurethane. I will show you the result tomorrow and then see how it wears when we get sailing.
新優化的替代船建造
當我打高爾夫球時,如果我因為錯誤的揮桿而從開球檯上開球丟了球,為什麼我的第二次嘗試總是完美的讓我想知道為什麼我在第一次擊球時沒有這樣揮桿!
當你建造第二艘船時,這有點像。第一次嘗試充滿了小錯誤、氣泡、船首和船尾的玻璃升起、使用了過多的環氧樹脂等。
昨天下午我開始了第二條船,今天早上打開它,她看起來很漂亮。如果你有興趣,這是我用幾張照片做的。
我首先修理舊的船體插頭,當我用 Dremel 從插頭上切下前一條船時修補了一些損壞。擦拭並塗上 5 層脫模蠟後,它就像新的一樣好,可以上籃了。
我從我之前製作的紙樣上剪下 3 張 124 克 S 玻璃。我買了 3 張牛皮紙,它們是從舊花束(我妻子的!)的交付中獲得的。我小心地將玻璃布直接剪到我之前製作的紙樣上的棕色紙上。布被剪得一塵不染。除了切割之外,我還用氈筆劃了一條中心線,並為船頭、船尾和前甲板的邊緣繪製了垂直線(到中心線)。這樣做是為了便於(將布鋪在塞子上時)與沿船體龍骨繪製的中心線以及指示前甲板的標記輕鬆對齊。牛皮紙不僅將三層布隔開,還可以將布捲起攜帶,同時保護邊緣,保持布面平整、清潔。 (圖 1)
去年夏天,在第一艘船建造時,我在桌子上切割了外面的玻璃,沒有使用任何紙或保護罩,最後在露台上佈滿了玻璃纖維!
布準備好後,我準備將船體放在花園棚子裡。昨天大約是 12 度,剛好足以與環氧樹脂一起工作。我需要一個工作台把船體倒過來夾住(圖 4),一塊木頭掛在棚子天花板上,用來擰緊插頭支撐柱在甲板上工作(圖 3),紙巾擦乾淨,丙酮清潔, 用於保護雙手的丁腈手套、West System 環氧樹脂(緩慢固化)、三個塑料罐(我使用的是 fromage frais 罐)、一個 2 英寸的油漆刷和一個用於去除氣泡的鋁輥、用於包裹環氧樹脂的剝離層、螺絲刀和用於安裝和拆卸插頭的電鑽。
現場準備好所有東西後,我就準備好了。使用自測柱塞混合環氧樹脂後,擰在樹脂和硬化劑罐上(3 次推柱塞將形成一層玻璃),我將樹脂塗在塞子的船體側,小心弄濕了甲板。環氧樹脂不會在蠟上光滑,並且會拉回看起來有點凌亂的小球,但沒關係。取第一層布並將船倒掛在工作台上,將其放在船體上方,對齊中心線、船首、船尾和前甲板標記,然後將布鋪在環氧樹脂塞上。 (圖 2 3 和 4)
用油漆刷輕輕撫平布,從中心開始工作,直到布整面平整。這很繁瑣,但通過花時間和耐心,布料會完美地佈置。下一步是用油漆刷(非常輕柔)在布上擦拭,然後在乾燥的地方弄濕布,邊走邊去除氣泡。謹慎使用環氧樹脂,因為多餘的樹脂只會增加重量。最後用鋁製滾輪越過船體,以消除任何遺漏的氣泡。
現在從工作台上取下塞子,然後擰到從棚頂掉下來的桿上。最初將船體倒置固定,然後小心地讓塞子向下旋轉,同時將布支撐在甲板上,直到甲板水平。 (在去年夏天的第一次構建中,我在弄濕船體上的布後從工作台上拿起塞子,旋轉它使甲板在最上面,將其升到支撐桿上,玻璃布掉到地板上。你有被警告了!)
在用畫筆將布塗到甲板上之前,切掉任何多餘的部分。在第一層上,我使用了 1 英寸的重疊。在第二層,我對接布的末端(即沒有重疊),在第三層再次使用重疊。通過這種方式,您可以避免沿著甲板中心線承受過多的重量。在我的第一艘船上,我最終在中心線上鋪了 6 層布,這使得船很結實,但兩端很重。
用油漆刷以與船體相同的方式將布塗到甲板上,直到平整光滑。抱歉,沒有照片,因為當時我的手套塗有環氧樹脂!
在光線充足的情況下檢查船體和甲板,確保沒有氣泡,並且佈在船頭和船尾處牢固粘合。
留下塞子,直到混合罐中剩餘的環氧樹脂開始變得粘稠。發生這種情況時,第一層布會很好地粘在插頭上,並且在塗抹第二層時不會移動。層與層之間放置的時間越長越好。半小時應該夠長了。
用丙酮清洗油漆刷、手套和滾筒,然後混合第二批環氧樹脂。將第一個攪拌鍋裝箱。
對於第二層,將布覆蓋在船體上,注意對準標記,並像以前一樣刷掉,使用足夠的環氧樹脂潤濕布。
重複第三層,記住清潔中間的工具。我在最後一層使用四滴環氧樹脂,因為我希望外層稍微濕潤。任何多餘的部分都會被剝離層吸收。
最後用剝離層包裹。我用了 10 米的 100 毫米寬。我知道矯枉過正,但即使船體看起來有點像木乃伊,它也做得很好。 (圖 5)
同時我製作了圖 8. 9. 10. 14、15 和 18 中的組件。 鰭箱是 Dave Creed 的作品。
我今天早上剝掉了剝離層,發現船體沒有氣泡,船頭、船尾和前甲板的附著力很好。
整個過程耗時約3小時
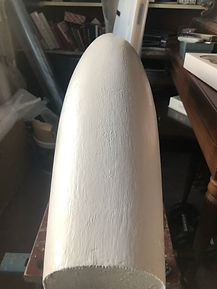
我現在需要的是兩層環氧底漆擦得光滑,我準備把船體從插頭上拆下來。 (圖 6 和 7)
如果一切看起來不錯並且我知道船體可以使用,我就可以支付設計費並將船安裝好。
添加了兩層環氧底漆後,是時候將其全部擦回 S 玻璃表面,使船體盡可能輕巧和光滑。長達兩個小時的打磨。喜悅!但最終的結果是值得的。
在塗上 250 克厚底環氧底漆後,週六我用砂紙打磨了 200 克。結果是一個非常輕且光滑的船體,您可以看到它。
船體將保持這種狀態,直到甲板完成並鑽完所有孔為止。然後是時候用金屬藍色包裹乙烯基了。迫不及待地想看看它在切斷模具時的結局。
一旦船體脫離模具,它就會直接進入支撐夾具,框架從設計計劃中切割出來。 該夾具被標記並用於設置鰭位置和方向舵。 (圖 7)
前甲板和後甲板使用 1 層 124 克布粘合(圖 13)。船體很堅固,可以將鰭箱、艙壁和相鄰的甲板和無線電罐粘合在一起。
週日,我切掉了所有的檢修孔,(圖 33)並在船體的鰭箱區域周圍再添加了兩層 S 玻璃,在懸臂起飛點將甲板與額外的一層 S 玻璃粘合在一起,並安裝了橫梁
我在船尾的甲板上放了一些小的加強板,並在前甲板的中央放了一層大約 1 英寸寬的 S 玻璃。
帶有所有玻璃基礎設施的船體總重量約為 400 克,比我的第一個船體輕得多,尤其是在兩端,但比專業船體重。話雖如此,船體非常堅固,兩端很輕,應該具有競爭力。
今天的工作是安裝尾翼、艙壁、甲板成型件和無線電罐以及懸臂大頭釘起飛點的支柱。在本週末完成船體的過程中。
密封船首和船尾的漫長一天,(圖 18 和 19)加強前甲板,建造超輕型前甲板柱(圖 14),在船體上切槽(圖 21),測量和塑造前艙壁(圖 15)和 16) ,鰭箱和甲板。下面有很多圖片,順序略有隨機。
明天我希望將所有部件粘合在一起,然後唯一的其他主要工作是安裝伺服和舵桿的板,這可能會在周三完成。然後最後擦拭並鑽出甲板配件的所有孔。最後,我可以用金屬藍色乙烯基包裹船。這是一個實驗,但我相信它是值得的,如果它不起作用,我總是可以畫它。
安裝鰭
昨天是關於安裝鰭箱。將尾翼與設計尺寸準確對齊並使其垂直是船上最關鍵的工作。弄錯了,船將很難平衡,並且可能會在一個方向上航行得比另一個方向高。
我的夾具中的船在其吃水線上設置為水平,即有一條水平線連接船頭底部和船尾底部。鰭的前緣垂直於這條線。獲得正確的夾具,一切都很容易。在平面圖中有兩種測量值,一種是從船體到尾翼前緣,另一種是從船首尖端到尾翼進入燈泡的底部。設置這些測量值,鰭前緣應垂直於船的吃水線。我還不到一個學位。 見圖 24-27。
為了使鰭從船尾完全垂直,我在護罩點調平船,並在鰭上使用水平儀使其垂直,然後使用膠帶將其固定。 重力有助於圖 27。
圖中的繩子用於測量從弓到鰭的長度,但我確實必須在夾具上打孔。
明天,我可以安裝甲板和艙壁的最後部分。
完成綁定
昨天是塗膠日。安裝前甲板、預鑽孔隔板、無線電鍋架和主板柱。
只有一個小錯誤。我忘了密封和加固鰭箱的頂部
今天我有最繁瑣的工作要做,加上最後適合伺服支架和舵桿支架。嵌套工作是預先鑽出所有的裝配孔,在需要的地方塗抹填充物,最後準備好鋪沙。
在安裝主板柱時,我準確地測量了甲板的中心線,然後用離甲板 6 英寸的繩子做同樣的事情。然後使用固定的正方形,我能夠使主板立柱直立並與鰭箱、後撐桿、懸臂板孔和懸臂連接點對齊,這些都已標記。手指越過帆將在兩個大頭釘上設置相同。
到目前為止,船體重量為 420 克。此時的舊船體重量為 620 克。也許 350gms 可以通過稍微更薄的上層實現。我對鰭底部的環氧樹脂很慷慨,但這就是校正器所在的地方。估計需要大約 400 克的校正器。
整理
昨天進行了最後一點加固。沒什麼可展示的,因為船看起來與前一天相似,但增加了舵桿和伺服支撐。對船體進行良好的切割以尋找任何粗糙點,然後是金屬藍色包裝
包裹後幾乎沒有剩餘的工作要做,例如鰭的最終安裝並添加電子設備和配件。
完成構建
隨著周五最後的工作結束,船體準備好包裝。我花了今天打磨和清潔船體和甲板,最後安裝鰭和舵,最終完全按照設計計劃完成並且彼此一致。明天將是包裝日。
從 Potters Solutions 訂購了新的 PG 鑽機,從 Sailsetc 訂購了一些零碎的東西。一旦船被包裹起來,我就可以使用除護罩之外的現有配件來設置新的鑽機。然後進行一些內部調整,我準備好上水了。
它不是一個包裝
包裹失敗。船體和甲板的曲率如此之大,您需要在應用前將包裹物拉得如此之多,而且您需要幾雙手,所以又回到了噴漆。
這艘船已經完成了噴霧,正如吉布森先生所說,你最好塗上油漆,因為損壞的乙烯基無法修復。他應該知道他過去常常將 18 英尺長的東西包裹起來。為什麼我不先和他說話。
夢想在那裡,經驗卻不見了。喜歡金屬飾面,但事實並非如此。
在 JJ Giltinan 的悉尼海港周圍觀看 18 英尺長的足球比賽。當然是在電腦上
油漆決定時間
為船挑選油漆是一個漫長的過程。我可以使用我久經考驗的 2 包聚氨酯,我知道它堅固耐用並且是正確的解決方案,但我確實想噴灑以保持甲板看起來很漂亮。如您所知,我嘗試使用乙烯基包裹物,但事實證明船的曲線太多了。
搜索使我噴塗了環氧樹脂、搪瓷和其他飾面的罐頭,但我在噴霧罐中發現了一種工業丙烯酸塗料。它設計用於修復室內或室外的工業塗層。我知道這是一個風險,但我今天下午準備了一個樣品,它有很好的顏色,堅硬、柔韌、抗紫外線性能好並且抗划痕。日期表在這裡:
http://www.farnell.com/datasheets/3165638.pdf
所以明天繼續,我們將看到油漆的表現。下圖顯示了樣品上的新噴塗外觀以及我在噴塗 2 件裝聚氨酯時試圖避免的效果。明天我會告訴你結果,然後看看我們航行時它的磨損情況。
電池問題
船體裝配完成,龍骨和方向舵完美對齊。當我去測試電子設備時,我開始給電池充電,並立即註意到它正在膨脹。因為有關於電池爆炸的有趣故事,所以我將電池取出到外面。還有兩個訂單。直到下週新的“PG 晶石和電池”到貨,進度才會停止。
請注意,如果您有一段時間沒有為 Lipo/lifo 電池充電,請留意它們。如果它們顯示出擴張的跡象,請將它們帶出房子。
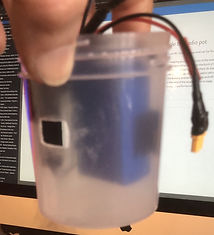
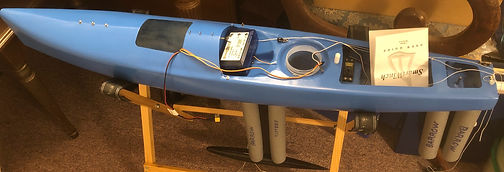
在收音機罐裡面
我閱讀了Darren Paulic 在 Facebook RC Sailing Group 上發表的一篇文章,可在此處找到。無線電控制在鹽水中航行。
在文章中,Darren 談到了讓您的電器遠離水並用凡士林或矽脂覆蓋的重要性。他在他的電池和接收器的底部放了一層氯丁橡膠,使它們遠離收音機鍋的底部,以防止它們進水。我想了一個簡單整潔的解決方案,發現你可以使用粘性背面魔術貼,就像你知道的那樣粘住,甚至是 Correx,以保持電池和伺服組件分開並遠離鍋底。您還可以在接收器電線的末端放一小塊,使它們彼此保持 90 度角,以獲得最佳的無線電信號性能。請記住將電池放置在船的中心線上。 圖 38 和 39。
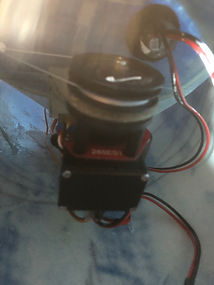
絞盤有問題,還是操作員錯誤 (圖 40)
首先向 Bill Green (RMG UK) 致以崇高的敬意,他提供超級服務,並且能夠快速回複查詢。當我拆卸並重新組裝我的無線電設備轉移到新船上時,我無法弄清楚為什麼當我轉動絞盤上的發射器轉了一圈時。關閉發射器,它返回到原來的位置。打電話給比爾應該可以解決這個問題。他正確地說我應該按照我以前沒有的手冊對絞盤限制進行編程,看看會發生什麼。我這樣做了,但沒有解決問題。
呃,我終於想起來了。在 Emsworth 訓練變焦上,他們的無線電天才理查德·巴拉斯 (Richard Ballas) 說要在發射器上設置故障安全模式。這使您可以在船上設置方向舵和床單,以便在船失去無線電信號時它會繞圈而不是駛向遠處。幾週前我已經設置了它,但忘記了它會做什麼。每次我關閉發射器時,床單會放鬆一圈半,方向舵轉動 25 度。打開發射器,板和舵返回到原來的位置。問題解決了,現在我要做的就是在完全裝配時微調絞盤設置。
目前的權重:
裸殼塗漆 460 克
配件和 RC 373gms
舵 32gms
燈泡和翅片 2500 克
鑽機估計 235 至 300 克
因此估計 365 到 400 克校正器。
這艘船盡顯榮耀。